# UI 项目
Base on Vue + Element UI,建议开发IDE Visual Studio Code
UI项目是一个由 Vue (opens new window)、 Vue Router (opens new window)和 webpack (opens new window) 驱动的单页应用。如果你以前使用过 Vue 的话,将会很容易上手。
# 目录结构
TenantSite.UI
├─public // vue-cli 创建的入口文件
└─src
    │  App.vue
    │  main.js
    │  settings.env.js // 环境设置
    │  settings.js // 应用设置
    │
    ├─api // api接口
    │  │  account.js // auth相关接口
    │  └─admin
    │          api.js           // api管理接口
    │          cache.js         // 缓存管理接口
    │          group.js         // 数据组管理接口
    │          login-log.js     // 登录日志接口
    │          operation-log.js // API访问日志管理接口
    │          permission.js    // 权限模板管理接口
    │          resource.js      // 资源管理接口
    │          role.js          // 角色管理接口
    │          user.js          // 用户管理接口
    ├─assets // 静态资源
    ├─components // vue 组件
    │  │  confirm-button.vue
    │  │  group-select.vue
    │  ├─auth // 鉴权组件
    │  └─main-layout // 主显示区布局组件
    ├─directives // 指令
    │  └─auth // 鉴权指令
    ├─i18n // 多语言
    ├─layouts // 页面布局组件
    │  └─basic-layout // 基础页面布局组件
    ├─libs    // 常用工具类库
    ├─request // ajax 请求
    ├─router  // 路由
    ├─store   // vuex 管理
    ├─styles  // 样式
    └─views   // 模块应用页面
        ├─account
        │  └─login            // 登录
        ├─admin
        │  ├─api-manage       // api管理
        │  ├─cache            // 缓存管理
        │  ├─dashboard        // api管理
        │  ├─error            // 错误页面
        │  ├─group            // 数据组页面
        │  ├─login-log        // 日志管理页面
        │  ├─operation-log    // API访问日志页面
        │  ├─permission       // 权限模板管理页面
        │  ├─permission-power // 权限模板赋权功能页面
        │  ├─resource         // 资源管理页面
        │  ├─role             // 角色管理页面
        │  ├─role-power       // 角色赋权功能页面
        │  ├─user             // 用户管理页面
        │  └─user-setting     // 个人中心页面
        └─iframe              // 外嵌页面组件
2
3
4
5
6
7
8
9
10
11
12
13
14
15
16
17
18
19
20
21
22
23
24
25
26
27
28
29
30
31
32
33
34
35
36
37
38
39
40
41
42
43
44
45
46
47
48
49
50
51
52
53
54
55
# 配置说明
更多配置见源码 src > settings.js 和 src > settings.env.js
const env = process.env.NODE_ENV;
const Setting = {
  //是否演示环境
  isDemo: env === "development" ? false : true,
  // 网页标题的后缀
  titleSuffix: "Tenant Site",
  // 路由模式,可选值为 history 或 hash
  routerMode: "history",
  // 应用的基路径
  routerBase: "/",

  // Cookies 默认保存时间,单位:天
  cookiesExpires: 1,

  //租户中心URL
  tenantCenterBaseURL:
    env === "development"
      ? "http://localhost:5188/"
      : "http://www.iusaas.com:5188/",

  // 租户策略
  // 0:login 登录时指定
  // 1:Host 通过Host获取
  tenantMode: env === "development" ? 0 : 1,

  // Tenant site server 接口请求地址
  // host 方式形如 http://{tenant}.localhost/
  // route方式形如 http://localhost/{tenant}/
  apiBaseURL:
    env === "development"
      ? "http://localhost:5188/${tenant}"
      : "http://${tenant}.iusaas.com:5188/",

  // 头像地址
  avatarURL:
    env === "development"
      ? "http://localhost:5188/upload/avatar/"
      : "http://www.iusaas.com:5188/upload/avatar/",

  layout: {
    // tab 类型 "" | border-card
    tabType: "",
    // tab位置 top | bottom
    tabPosition: "top",
    // 是否显示重载按钮
    showReload: true,
    // 是否显示全屏按钮
    showFullscreen: true,
    // 是否显示通知
    showNotice: true,
    // 是否显示多语言
    showI18n: true,
    // 退出登录时,是否二次确认
    logoutConfirm: true,
    // 面包屑是否显示图标
    showBreadcrumbIcon: false,
    // 标签是否显示图标
    showTabIcon: true
  },
  // 相同路由,不同参数间进行切换,是否强力更新
  sameRouteForceUpdate: false
};
2
3
4
5
6
7
8
9
10
11
12
13
14
15
16
17
18
19
20
21
22
23
24
25
26
27
28
29
30
31
32
33
34
35
36
37
38
39
40
41
42
43
44
45
46
47
48
49
50
51
52
53
54
55
56
57
58
59
60
61
62
63
# 新增应用
为了更准确描述步骤,下方以字典管理模块为例介绍步骤
模块名:Dictionary
# 第一步:创建vue组件(页面)
在 src > views 下创建文件夹 dictionary 在dictionary下创建字典业务应用
# 第二步:创建API
在 src > api 下创建文件夹dictionary
src
  ├─api // api接口
      ├─ _base
      │    └─ api.js 通用接口方法
      └─ dictionary
          ├─ dictionary-entry.js 字典条目(字典明细) 接口文件
          └─ dictionary-header.js 字典头(字典分类) 接口文件
2
3
4
5
6
7
通用接口已实现,如下
- execCreate 创建
- execDelete 物理删除-单个
- execDeleteBatch 物理删除-批量
- execSoftDelete 逻辑删除-单个
- execSoftDeleteBatch 逻辑删除-批量
- execUpdate 更新
- getAll 得到条件下的所有数据
- getList 得到条件下的分页数据
- getItem 得到单条记录实体
示例
# 第三步:创建资源导航
此步为纯配置 在资源管理中增加模块资源
# 第四步:授权资源
此步为纯配置
- 在角色赋权中进行资源赋权(你也可以新建角色在赋权)
- 刷新网页即可看到新增的导航菜单(或退出重新登录)
# 组件
公共组件均存放在 src > components 文件夹中
# a-auto-container
自动适应屏幕容器布局组件
使用方法:
<template>
<a-auto-container>
 <!-- 需要外层自适应的Dom对象 -->
</a-auto-container>
</template>
<script>
import AAutoContainer from "@/components/a-auto-container";
export default {
  components: {
    AAutoContainer
  }
}
</script>
2
3
4
5
6
7
8
9
10
11
12
13
# a-condition
动态条件构造器组件
Code 示例
<template>
  <a-condition :fields="fields"  v-model="value1">
  </a-condition>
</template>

<script>
import ACondition from "@/components/a-condition";
export default {
  components: {
    ACondition
  },
  data(){
    return {
      value1:"",
      fields:[
        {"value":"nickName","label":"昵称","type":"string"},
        {"value":"createTime","label":"创建时间","type":"date"}
      ]
    };
  }
}
</script>
2
3
4
5
6
7
8
9
10
11
12
13
14
15
16
17
18
19
20
21
22
Attributes:
| 参数名 | 说明 | 类型 | 默认值 | 示例 |
|---|---|---|---|---|
| value / v-model | 绑定值 | String | - | - |
| fields | 可选择的字段集合 | Array | - | [{"value":"nickName","label":"昵称","type":"string"}] |
| variables | 公共变量 | Array | [] | [{"value":"{UserId}","label":"用户Id"}] |
# a-confirm-button
确认按钮
用于替代 旧的 confirm-button.vue 组件
Code 示例
<template>
  <a-confirm-button
  type="submit"
  :validate="formValidate"
  :loading="loading"
  >
  </a-confirm-button>
</template>

<script>
import AConfirmButton from "@/components/a-confirm-button";
export default {
  components: {
    AConfirmButton
  },
  data(){
    return {
      loading:false
    };
  },
  methods: {
    formValidate: function() {
      let isValid = false;
      // 验证逻辑
      return isValid;
    },
  }
}
</script>
2
3
4
5
6
7
8
9
10
11
12
13
14
15
16
17
18
19
20
21
22
23
24
25
26
27
28
29
Attributes
| 参数名 | 说明 | 类型 | 可选值 | 默认值 |
|---|---|---|---|---|
| title | 提示窗口的标题 | String | - | "" |
| content | 提示窗口的内容 | String | - | "" |
| loading | 显示载入icon | Boolean | - | false |
| disabled | 禁用标记 | Boolean | - | false |
| placement | 出现位置 | String | top/top-start/top-end/bottom/bottom-start/bottom-end/left/left-start/left-end/right/right-start/right-end | top-end |
| type | 按钮类型 | String | delete/其他 | submit |
| icon | icon图标 | String | element-ui icon | "" |
| validate | 验证函数 | Function | - | - |
Slot
| 名称 | 说明 |
|---|---|
| content | 自定义的提示文本 |
# a-dictionary
字典数据选择器
为 element-ui 的 el-cascader 二次封装组件
Code 示例
<template>
  <a-dictionary
    v-model="value1"
    code="SYS_CONDITION"
    @change="onChange"
  ></a-dictionary>
</template>

<script>
import ADictionary from "@/components/a-dictionary";
export default {
  components: {
    ADictionary
  },
  data(){
    return {
      value1:""
    };
  },
  methods: {
  }
}
</script>
2
3
4
5
6
7
8
9
10
11
12
13
14
15
16
17
18
19
20
21
22
23
Attributes
| 参数名 | 说明 | 类型 | 可选值 | 默认值 |
|---|---|---|---|---|
| value / v-model | 绑定值 | String | - | - |
| code | 字典头(字典分类)Code | String | - | "" |
| filterKey | 查询关键字(支持标题、值、描述的内容查询) | String | - | "" |
| withDisable | 是否包含禁用的条目 | Boolean | - | false |
| multiple | 是否支持多选 | Boolean | - | false |
| disabled | 禁用标记 | Boolean | - | false |
Events
| 事件名 | 说明 | 参数 |
|---|---|---|
| change | 值发生变化后触发 | 选中的结果 selection |
| load | 字典数据从后台加载完成触发 | 从后台获取的字典数据列表 data |
# a-group
组织机构数据选择器
为 element-ui 的 el-cascader 二次封装组件
Code 示例
<template>
  <a-group v-model="value1"></a-group>
</template>

<script>
import AGroup from "@/components/a-group";
export default {
  components: {
    AGroup
  },
  data(){
    return {
      value1 : ""
    };
  }
}
</script>
2
3
4
5
6
7
8
9
10
11
12
13
14
15
16
17
Attributes
| 参数名 | 说明 | 类型 | 可选值 | 默认值 |
|---|---|---|---|---|
| value / v-model | 绑定值 | String | - | - |
| placeholder | 绑定值 | String | - | 请选择 |
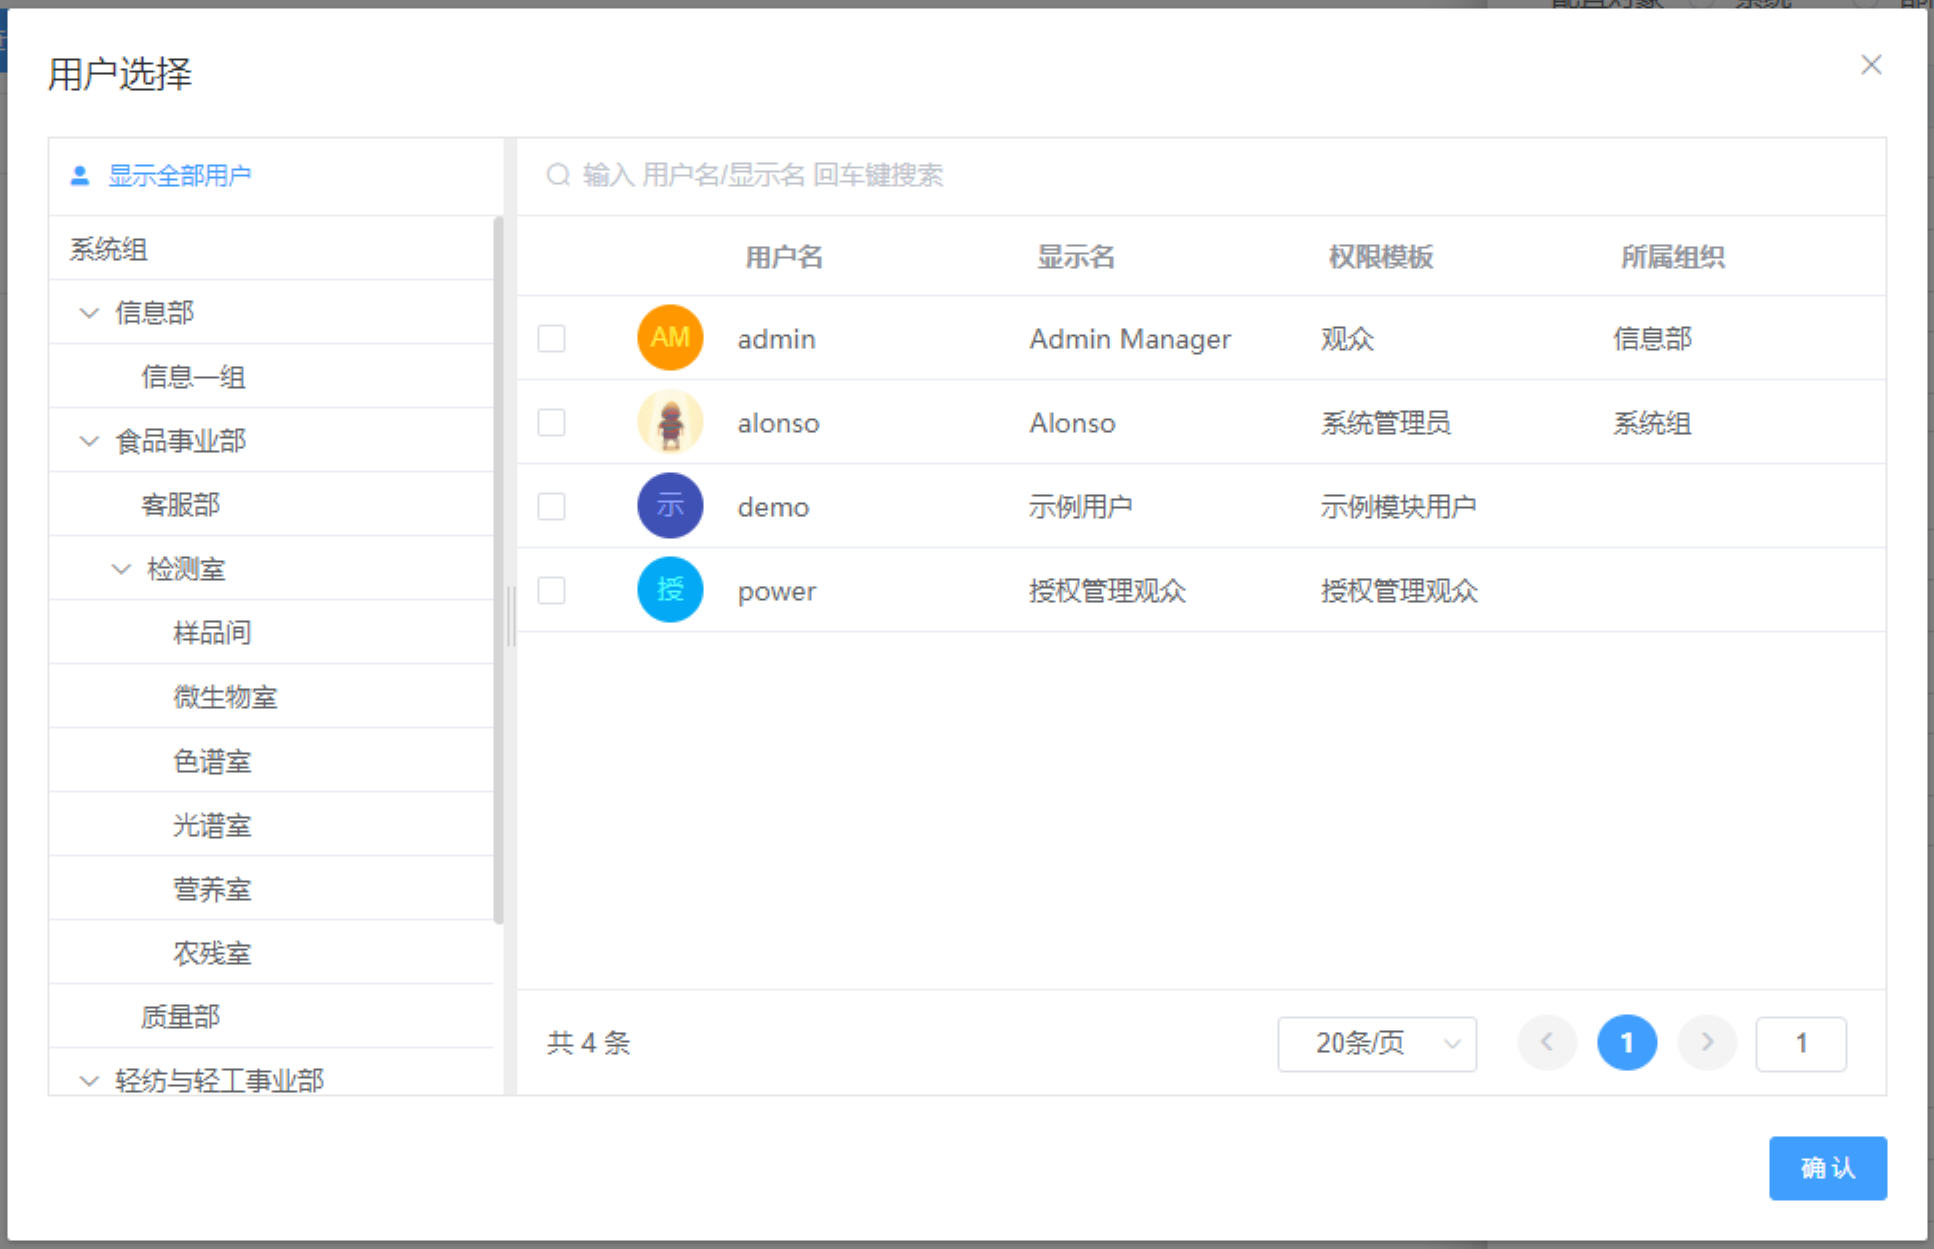
# a-user
用户数据选择器
示例:见演示环境的配置管理> 新增或编辑(需要用系统管理登录才可使用功能) 切换到用户配置 选择用户
 Code 示例
<template>
  <a-user v-model="value1"></a-user>
</template>

<script>
import AUser from "@/components/a-user";
export default {
  components: {
    AUser
  },
  data(){
    return {
      value1 : "" // 如果多选值类型为数组
    };
  }
}
</script>
2
3
4
5
6
7
8
9
10
11
12
13
14
15
16
17
Attributes
| 参数名 | 说明 | 类型 | 可选值 | 默认值 |
|---|---|---|---|---|
| value / v-model | 绑定值 | String/Array | - | - |
| label | 显示名称 | String/Array | - | - |
| placeholder | 提示文本 | String | - | 请选择 |
| valueKey | 值绑定属性 | String | 用户实体属性 | id |
| labelKey | 显示文本绑定属性 | String | 用户实体属性 | userName |
| multiple | 是否多选 | Boolean | - | false |
| disabled | 是否禁用 | Boolean | - | false |
Events
| 事件名 | 说明 | 参数 |
|---|---|---|
| select | 选择用户后触发 | 选中用户实体对象 selection |
# auth
鉴权组件
鉴权组件是一个抽象组件,通过判断准入的权限及用户的权限,来决定是否展示内容。该组件支持多种权限配置,以及对单独功能点操作的鉴权。 同时系统提供了鉴权指令
Code 示例
<template>
  <auth :authority="['Edit', 'Delete']">
    <template slot="noMatch">
      你无权查看评论内容
    </template>
    评论内容
  </auth>
</template>

<script>
import Auth from "@/components/auth";
export default {
  components: {
    Auth
  },
  data(){
    return {
    };
  }
}
</script>
2
3
4
5
6
7
8
9
10
11
12
13
14
15
16
17
18
19
20
21
Auth Props
| 参数名 | 说明 | 类型 | 可选值 | 默认值 |
|---|---|---|---|---|
| authority | 准入权限 | String, Array, Function, Boolean | - | true |
| access | 用户权限 | String, Array | - | - |
| prevent | 是否开启阻止模式,开启后,不会返回 noMatch 的 slot,而是阻止组件内的点击,反而给一个 $Message 提示,常用于 Button 操作 | Boolean | - | false |
| message | 在 prevent 开启时有效,点击提示的内容,当开启 custom-tip 时无效 | String | - | 您没有权限进行此操作 |
| custom-tip | 在 prevent 开启时有效,通过监听 @click 自定义提示 | Boolean | - | false |
| display | 在 withContainer 开启时有效,设置包裹组件的 display 类型,包裹组件是一个 div 元素 | String | - | - |
| withContainer | 关闭后,在外层将不在包裹dom | Boolean | - | true |
Auth Events
| 事件名 | 说明 | 参数 |
|---|---|---|
| click | 当开启 prevent,且鉴权不通过时,点击会触发 | event |
Auth Slots
| 名称 | 说明 |
|---|---|
| default | 显示内容 |
| noMatch | 无权时,显示内容 |
# 指令
# v-auth
鉴权指令
同时系统提供了鉴权组件
<template>
   <span v-auth.some="['admin1', 'admin2']">满足指定权限数组中一个即可</span>
   <span v-auth.every="['admin1', 'admin2']">满足指定权限数组中所有方可</span>
   <span v-auth="'admin1'">不设置修饰符情况下默认为some</span>
</template>
<script>

</script>
2
3
4
5
6
7
8
# 示例代码
# api接口示例
dictionary-header.js 内容如下:
// import request from "@/request"; //如果有自定义接口 取消注释 使用request对象进行API访问

import api from "@/api/_base/api.js";
let baseApi = api("/api/v1/Dictionary/DictionaryHeader");

// 通用接口 开始
export const execCreate = baseApi.execCreate;
export const execDelete = baseApi.execDelete;
export const execDeleteBatch = baseApi.execDeleteBatch;
export const execSoftDelete = baseApi.execSoftDelete;
export const execSoftDeleteBatch = baseApi.execSoftDeleteBatch;
export const execUpdate = baseApi.execUpdate;
export const getAll = baseApi.getAll;
export const getList = baseApi.getList;
export const getItem = baseApi.getItem;
// 通用接口 结束

// ---------------------------------------------------------------

// 自定义接口 开始
// ...这儿编写接口函数
// 自定义接口 结束
2
3
4
5
6
7
8
9
10
11
12
13
14
15
16
17
18
19
20
21
22